Oregon Albacore

For the first half of my life, I thought albacore tuna was something you had to buy in a tin can.
The cans were always the same size as the ones my cat’s dinner came in, and the contents didn’t look much different: a bunch of fishy shreds swimming around in murky liquid. I’d buy the one with the cartoon fish on the label, or the mermaid, depending on which was on sale. If I was feeling really fancy and gourmet, I’d opt for one of the pricier and more serious-looking Italian imports.
Then we moved to Oregon.

Here, Pacific albacore tuna is revered as a local treasure, lower in mercury and sustainably caught by hook and line. Fish counters and restaurants trumpet their sparkling fresh loins and steaks all summer long. My first taste after moving here was a revelation to me. The mild, almost lemony flavor and meaty texture were nothing like those fishy shreds I was used to, and soon I was anticipating the summer catch every year just as much as I did the summer sun.
And when I found out I could head to Newport and buy a whole fish fresh off the dock from the fishermen themselves, taking a “tuna trek” every July or August became a summer tradition.
Buying the fish off the docks is far cheaper than getting it at the store — about $2 to $3 per pound versus $8 to $14. True, you’re paying based on the whole weight of the fish, and half of it gets trimmed off as waste (fins, head/collar, bones). But it still works out to be a lot cheaper, and certainly fresher. And if you’re inclined, you can keep your trimmings and use them to make stock, or broil or grill the collar in the Japanese way. Plus, you’re supporting the fishermen directly. (The Oregon Albacore Commission has this handy video if you’re new to the process of buying direct.)
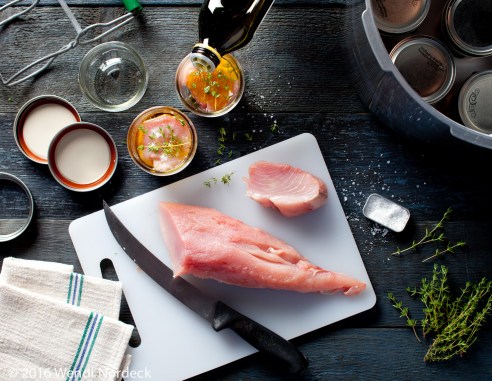
I highly recommend keeping the collar, but main thing you’re going for is the loins, those big, long, triangular pieces of firm meat. Cut them into thick slabs and poach, grill, or briefly marinate and sear, like I did for these Niçoise salad skewers. And when you’ve had your fill, you can preserve the rest by making your own canned tuna.
Tuna is a low-acid food, so you’ll need a pressure canner, not a water-bath canner, to can it. I bought a brand-new, 23-quart Presto pressure canner super cheap on Craigslist, but they’re easy to find on Amazon and, apparently, Walmart. All-American is another, more heavy duty (and expensive) brand sold locally at Mirador kitchen store. (You can compare the two here.) And if you don’t have space for yet another pot, or just want to dip a toe in, you can rent pressure canners through Portland’s very cool kitchen tool lending library.

Technically, canning tuna is easy: just pack the fresh fish in sterile jars, seal, and process according to the manufacturer’s instructions. But I’m the first to admit getting the jars and canner ready, then standing by for an hour and 40 minutes while it processes, is time consuming. Still, it’s totally worth it when you get to customize each jar with things like fresh herbs, spices, garlic and chiles. Then when you crack one open to add to salads, pastas and sandwiches, it’s already full of flavor.

I’ve been told you don’t have to add liquid to the jars since the fish will provide its own juice as it gets cooked, but I always add oil because it makes for a more luscious final product and creates a flavorful liquid that’s an asset all its own. Trust me, once you’ve had your own oil-packed, herb-infused canned tuna, you can never go back to store-bought.

DIY Canned Albacore Tuna
Makes about 10 half-pint jars
I started canning tuna because I became addicted to buying fresh albacore directly from the fishermen in Newport. It’s the freshest tuna you can get, and the flavor is just incredible. But a whole tuna offers a lot of meat, I had to find a way to preserve the bounty. To me, the fish loses a lot of its flavor once it’s frozen. But when you can it, you can actually add flavor in the form of olive oil, herbs and spices. Pressure canners might seem intimidating, but they’re really quite safe. Just RTFM (as my husband likes to say) and you’ll be fine.
3 1/2 pounds fresh albacore tuna loins
Olive oil
Salt
Fresh herbs, spices, garlic or chiles
Sterilize 10 half-pint, wide-mouth jars, plus their lids and rings, by immersing in a large pot of boiling water for 1 minute, or by setting on a rimmed baking sheet and heating in a 250-degree oven for 20 minutes. (I prefer the oven method because it’s less messy. However, you’ll still need to bring a medium saucepan of water to a boil for filling the canner, and you can use the boiling water to sterilize the lids and rings.)
Trim any hard connective tissue off the tuna, and if it still has its dark red line of flesh called the bloodline, trim it away (the taste is too fishy). Cut the tuna crosswise into 1 1/2-inch-thick fillets. Pack the fillets into the sterilized jars making sure to leave 1-inch of headspace. (They don’t have to be hot, like they do when water-bath canning. In fact, it’s better if they’ve cooled so the fish doesn’t stick to the sides when you pack it in.) When necessary, cut the fillets to fit and use scraps to fill any gaps.
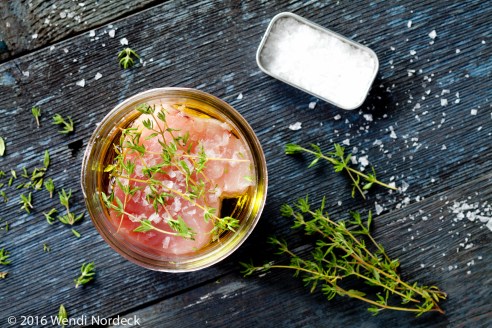
Sprinkle the fish with a generous pinch of salt and add fresh herbs, garlic, chiles or seasonings if desired. Pour in enough olive oil to cover the fish, making sure to still leave at least 3/4-inch headspace. Slip a chopstick or butter knife between the sides of the jar and the fish, to allow the oil to flow all around and fill up any air pockets.
Wipe the rims of the jars with a damp, clean paper towel. Add the lids and rings.
Set jars on the rack in the pressure canner (yes, you can stack them on top of each other). Add 3 quarts of boiling water, or enough to fill the canner by 2 to 3 inches (there is usually a fill line mark inside the canner). Lock the lid in place, remove the weighted pressure regulator, and set the canner over high heat. Allow steam to vent for 10 minutes to push out any air, then cover the vent with the pressure regulator. When pressure hits 11 pounds, process the jars for 1 hour and 40 minutes, adjusting the heat as necessary to keep it at 11 pounds. (If it ever drops below, stop the timer and bring the canner back up to pressure before starting it up again.)
When time is up, turn off the heat and allow the pressure to naturally drop until the air vent is completely down. Allow the jars to cool completely, then check the seals. Any jars that aren’t sealed should be refrigerated and the tuna eaten within several days.

Leave a comment